UI
How to use mikLib UI
To disable Brain UI and make mikLib upload wirelessly faster, go to makefile and
set FAST_COMPILE = 1.
If you want to swap to a screen write code below. Available screens are auton_scr, console_scr, graph_scr, config_scr, motors_scr and pneumatic_scr
// Swaps to console screen
UI_select_scr(console_scr->get_console_screen());
Auton Screen
Controller UI
The auton screen appears on the controller at the start of the program.

| Button | Action |
|---|---|
| Dpad | Move Cursor |
| A | Select |
| B | Back |
| X | Close Selector |
| Y | Calibrate Auto. Double press to run auto |
If you have a micro SD card inside the brain configured to FAT32 the last selected auton will save on program restart
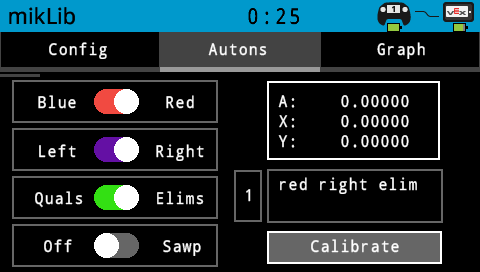
There are 5 toggles to select which determine what auto to run as well as a variation toggle that cycles 1-4.
[Red/Blue] [Left/Right] [Qual/Elim] [Off/SAWP] [Off/Skills] [1]
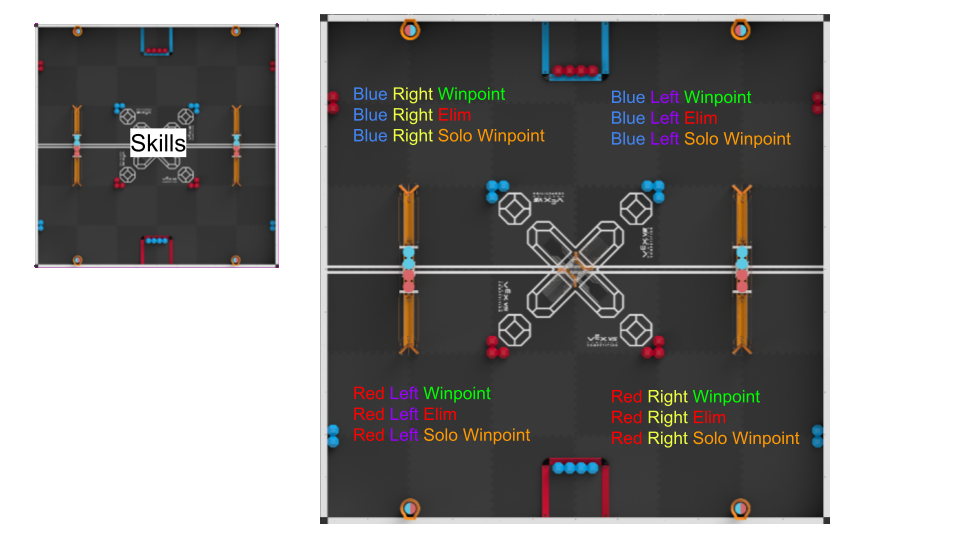
With each auton set up in this format
std::string blue_left_winpoint(bool calibrate, auto_variation var, bool get_name) {
    if (get_name) return "blue left winpoint";

    // Mirror autos here

    if (calibrate) {
        chassis.set_coordinates(0, 0, 0);
        return "";
    }

    chassis.drive_to_point(24, 24);

    return "";
}
[Desc]Will display the name of the autonblue left winpoint.[Calib]Will set the robots coordinates[Run]Will have the robot drive to 24, 24
The calibrate section allows you can run motions to align the robot, so in a competition you would place the robot down aligned with the field tiles, press calibrate to lock its position. Then position it where you actually want it. After that you can plug into field controller and wait for auton to run.
If you run auton through UI it can be cancelled anytime with back button
Mirroring
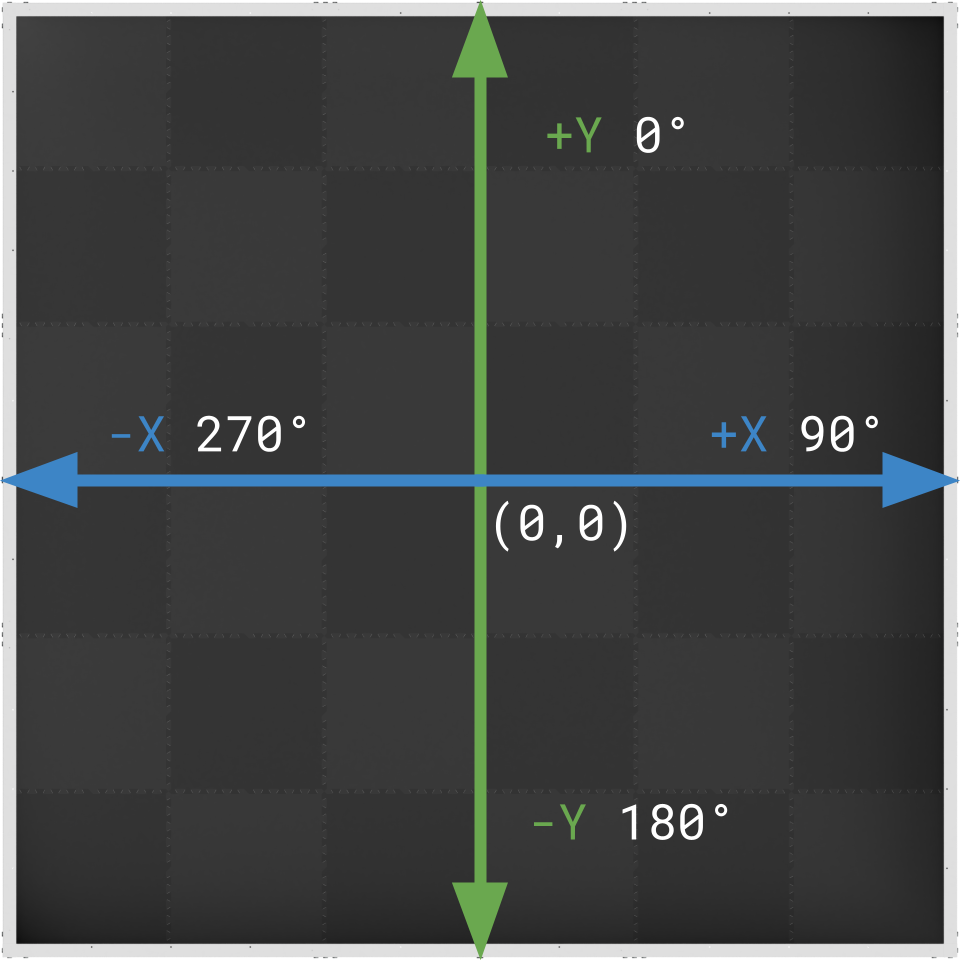
In order to properly mirror autons and distance reset, the VEX coordinate system needs to be used. Planning autos on path.jerryio is the easiest way to get the correct points
This auto is a red right winpoint.
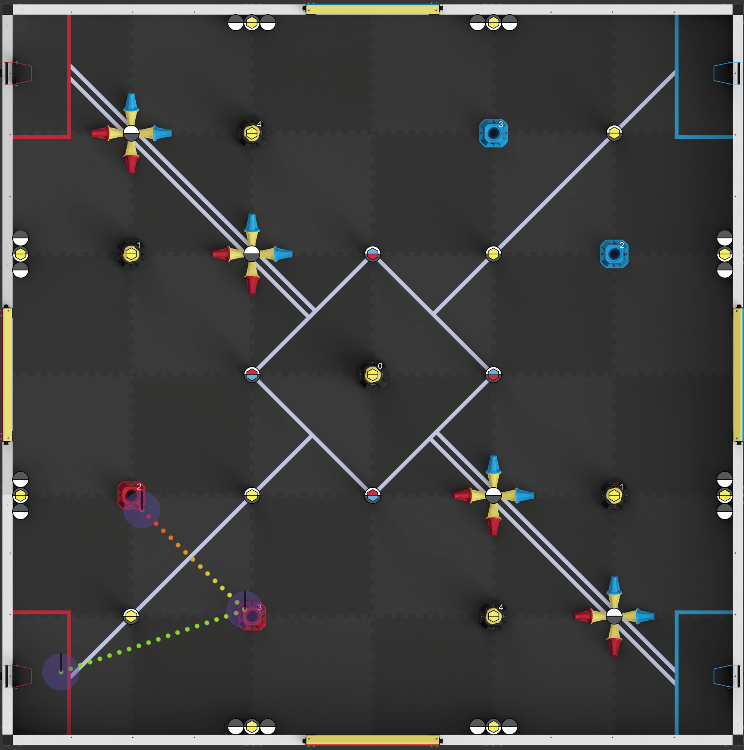
std::string red_right_winpoint(bool calibrate, auto_variation var, bool get_name) {
    if (get_name) return "red right winpoint";

    if (calibrate) {
        chassis.set_coordinates(-59.08, -58.58, 0);
        return "";
    }

    chassis.drive_to_point(-24.15, -47.17);
    chassis.drive_to_point(-46.78, -24.19);
    return "";
}
To mirror it across the field to blue, we need to mirror the x and y pos.
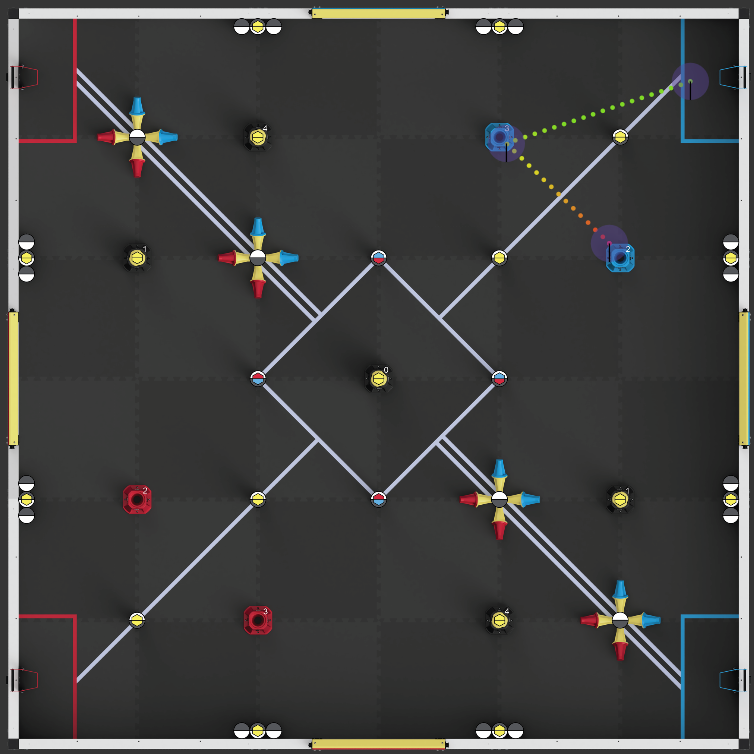
std::string blue_right_winpoint(bool calibrate, auto_variation var, bool get_name) {
    if (get_name) return "blue right winpoint";

    // Mirror across field, applies to all drive motions
    chassis.mirror_all_auton_x_pos();
    chassis.mirror_all_auton_y_pos();

    if (calibrate) {
        // Call red right winpoint mirrored
        red_right_winpoint(calibrate, var, get_name);
        return "";
    }

    red_right_winpoint(calibrate, var, get_name);
    return "";
}
Mirroring x or y pos also handles mirroring angles and converting left swing to right swing
Mirroring stays on until the program restarts or you call chassis.disable_mirroring().
This only matters when testing multiple autos in one session. Switching to a
non-mirrored auto without a restart will still run mirrored.
Variations
Auton variations allow you do run different autos with the same
toggles, with 4 available per selection one, two, three, and four.
std::string blw_var2(bool calibrate, auto_variation var, bool get_name) {
    if (get_name) return "blw var 2";

    if (calibrate) {
        chassis.set_coordinates(10, 10, 0);
        return "";
    }

    chassis.turn_to_point(12, 12);

    return "";
}

// Base auto, call variations from here
std::string blue_left_winpoint(bool calibrate, auto_variation var, bool get_name) {
    if (var == one) { } // If [1] run this auto
    if (var == two) return blw_var2(calibrate, var, get_name); // if [2] run btw var2

    if (get_name) return "blue left winpoint";


    if (calibrate) {
        chassis.set_coordinates(0, 0, 0);
        return "";
    }

    chassis.drive_to_point(24, 24);

    return "";
}
[Blue] [Left] [Qual] [1]runschassis.drive_to_point(24, 24);[Blue] [Left] [Qual] [2]runschassis.turn_to_point(12, 12);
Extra modifiers

There are 3 extra buttons at the bottom of the controller screen
[Off/Cap]When auton is ran it will timeout after 15 seconds. 60 seconds for skills run[RCal]Recalibrates the inertial sensor[Off/Odom]Displays odom coords while auto is running
Brain UI
The 2nd tab of the home screen holds the auton selector on the Brain. It works the exact same as controller selector, with some of the functionality on the config tab.
Console Screen
The console screen is the 4th tab on the homepage, and can be accessed by scrolling to the right. It allows text to be displayed and updated asynchronously. Config buttons that need to display text will use this screen. Clicking on any text will hover it light gray and remove it from the list.
Do not spam console_scr->add or the program will crash, use print or std::cout instead
Adding Text
Static Text
console_scr->add("Hello World!");
Updated Text
console_scr->add("Time: ", [](){ return Brain.Timer.time(msec); });

// Rounded to 2 decimal places, removes trailing zeros
console_scr->add("Angle: ", [](){ return to_string_float(chassis.get_absolute_heading(), 2); });
Any raw floats passed in by default will be rounded to 5 decimal places.

Config Screen
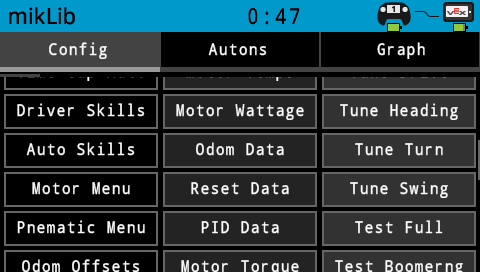
There are 3 columns of buttons on the config screen, Macro, Data and Test/Tune. You can scroll down on the config screen
by pressing down for a second and while holding move finger down.
Macro Column
| Button | Description |
|---|---|
| Run Auto | Run selected auto by the auton selector, runs a 3 second countdown before starting |
| Time Cap Auto | Limits max time allowed for ran auton to 15 seconds, or 60 seconds for auton skills |
| Driver Skills | Starts a practice driver skills run. Waits 3 seconds before starting and then puts a 60 second timer on controller. Controller vibrates at 30, 15 and 5 seconds |
| Auto Skills | Selects skills auton |
| Motor Menu | Goes to motors screen |
| Pneumatic Menu | Goes to pneumatic screen |
| Odom Offsets | Turns robot 10 times and computes odom offsets, displayed on console screen |
| Reset Offsets | Turns in place near field walls to find distance reset offsets. Place robot here |
| Wipe SD | Clears SD card. Wipes selected auto and saved tuning parameters |
Data Column
| Button | Description |
|---|---|
| Error Data | Displays any errors on console screen (disconnected devices) detected on startup. If errors are detected on startup the controller will buzz |
| Motor Temps | Displays motor temps on console screen. Around 80% is when the motors are overheated |
| Motor Wattage | How many watts each motor is pulling. Mainly used to determine friction within the drive or intake |
| Odom Data | Displays inertial angles and tracker/drivetrain positions. Heading is in degrees, positions in inches |
| Reset Data | Displays where the distance sensors think the robot is. Laid out in the format, odom x, y, and heading. Then each distance sensors wall facing, computed x or y position and D: distance in inches. Use this simulation for troubleshooting. For wall detection to work the robot needs to have its position set with chassis.set_coordinates before the button is pressed. |
| PID Data | Displays all constants changed during tune mode |
| Motor Torque | Displays how much torque each motor is applying |
| Motor Eff | Displays how efficient each motor is (output power / input power) |
| Motor Current | How many amps each motor is pulling, used usually to see if you have bad motor |
Test/Tune
| Button | Description |
|---|---|
| Tune Mode | Cycles between two tune modes, relative and odom. When the button is pressed it will run test_constants(). When set to relative it will not use odom points while in tuning mode and odom mode will. |
| Tune Drive | Enables tuning mode for drive |
| Tune Heading | Enables tuning mode for heading |
| Tune Turn | Enables tuning mode for turn |
| Tune Swing | Enables tuning mode for swing |
| Test Full | Run a mix of all relative or odom motions |
| Test Boomerng | Runs drive to pose |
| Test Chaining | Runs motion chained test full |
| Test Holonomic | Runs holonomic motions |
Graph Screen
The graph screen is used when tune mode is selected on the config screen.
Setting up plotting
To plot on the graph first set up the bounds, and or title
int y_min = 0;
int y_max = 360;

int x_min = 0;
int x_max = 5000;

int x_step = 1; // How much to increase x by each tick
int tick_rate_ms = 1; // How long before graphing next data point

graph_scr->set_plot_bounds(y_min, y_max, x_min, x_max, x_step, tick_rate_ms);
graph_scr->set_title("Graphing Sin");
Then add in the data you want to plot
graph_scr->set_plot([](double x) { return 360 * sin(x * .01); }, {"sin", "#4a86e8"});
Now you can graph your function
graph_scr->graph();
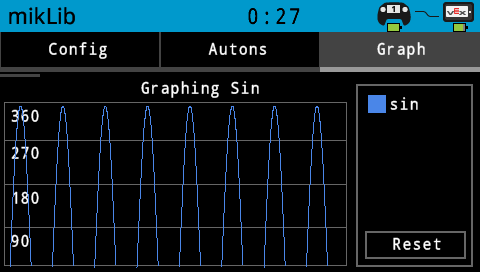
To reset the graph and start re-graphing the function press the reset button in the bottom right corner
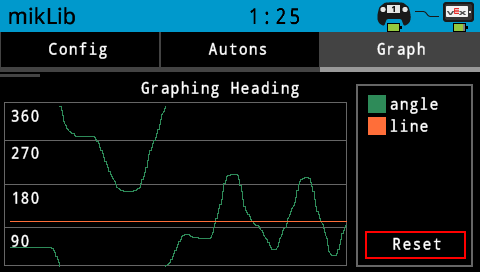
You can also plot multiple functions at the same time. Using the same bounds
graph_scr->set_title("Graphing Heading");
graph_scr->set_plot({
    [](double x) { return chassis.get_absolute_heading(); },
    [](double x) { return 100; }
}, {
    {"angle", "#2e8b59"},
    {"line", "#ff6e39"}
});
Motors Screen
The motors screen displays all mik::motors. It can be accessed on the config screen or by scrolling to the 5th tab on the homepage
- If a motor is plugged in then its port will appear white.
- To spin a motor backwards press the left arrow, with right arrow for forwards. Press arrow again stop the motor
- The voltage at which the motor is spun at is determined which voltage is selected to the right
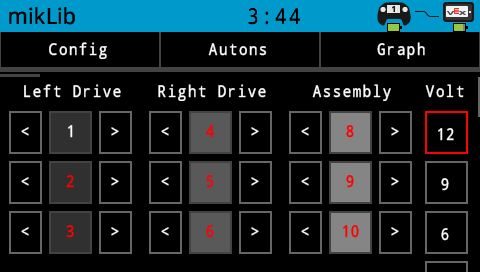
Motor on PORT1 is plugged in, with the rest unplugged
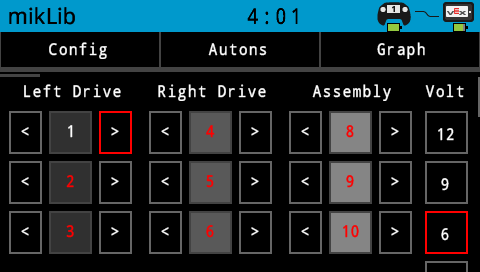
Motor on PORT1 is spinning forward at 6 volts
Pneumatic Screen
The pneumatic screen allows you to open and close all solenoids. It can be accessed by pressing on the Pneumatic Menu button on the config
screen or by scrolling to the 6th tab on the homepage

You can also use buttons at the bottom to change what triport the pnematic screen activates. By default it will use Brain ports