PID Tuning
How to tune the PID controllers in mikLib
Introduction
PID is three constants that control your robot's velocity in order to reach a desired position. PID is used in all of mikLib's motion algorithms, and it is what allows the robot to smoothly decelerate to the target. You can check out this video for more information.
Constants
The default constants are in autons.cpp with 4 different PID controllers.
Max voltage is on a 0-12 scale
// Each constant set is in the form of (maxVoltage, kP, kI, kD, startI, slew).
chassis.set_drive_constants(8, 1.5, 0, 10, 0, 2);
chassis.set_heading_constants(10, .4, 0, 1, 0, 0);
chassis.set_turn_constants(12, .4, .03, 3, 15, 0);
chassis.set_swing_constants(12, .4, .01, 2, 15, 0);
| PID | What it does |
|---|---|
drive | Drives the robot laterally to a target |
heading | Corrects the robot's heading while driving so it faces the target |
turn | Turns the robot with both sides of the drivetrain |
swing | Turns the robot with one side of the drivetrain |
For beginners it is recommended to use the default constants
How to Tune PID
1. Tune kP and kD
- Does the robot oscillate around the target?
- No -> Increase kP until it does.
- Yes -> Increase kD until the robot smoothly decelerates to target
2. Tune kI
kI is not needed in most cases except small movements like turning 5 degrees. You can skip this step.
Whenever you give kI a value, make sure you also set startI to limit the distance the integral term is applied to
prevent integral windup.
- Does the robot overshoot the target?
- No (undershooting) -> increase kI
- Yes -> decrease kI
3. Tune Slew
Slew is the max allowed change in voltage over 10ms. 24 allows the robot to go from -12 to 12 volts which is max slew. 0 disables it.
Only tune slew if you don't have a forward tracking wheel, or robot tips easily.
- Does robot tip or wheels slip?
- No -> increase slew
- Yes -> decrease slew
Tuner Setup
mikLib allows you to tune the PID in real time and graph the output.
To start open test.cpp. test_constants() holds the constants used while tuning. Zero out the
constants you are about to tune.
void test_constants() {
    default_constants();

    // Constants being tuned, (maxVoltage, kP, kI, kD, startI, slew)
    chassis.set_drive_constants(10, 0, 0, 0, 0, 0);
}
It is optional but recommended to get a micro SD card formatted to FAT32 and plug it into the brain. Every constant you edit while tuning gets saved to the SD card, letting you display which values you changed afterwards.
Then run the program and press Config. On the top right press Tune Mode until it reads
Tune Relative, this will activate test_constants(). Then press the test button corresponding to the PID that you want to tune, for drive PID,
do Tune Drive.
The graph will pop up on the brain, and the controller screen will show all the constants to tune. Follow the steps in the How to Tune PID section. Repeat for the drive, turn, and swing PIDs.
The heading PID usually doesn't need tuning, you can put in your turn PID with kI removed or use defaults.
Controller Controls
| Button | Action |
|---|---|
| Joysticks | Drive the robot (only when no test is running) |
| Up Arrow | Move cursor to the value above |
| Down Arrow | Move cursor to the value below |
| Right Arrow | Shift the digit cursor one place to the right |
| Left Arrow | Shift the digit cursor one place to the left |
| A | Increase the hovered digit by 1 |
| Y | Decrease the hovered digit by 1 |
| X | Start the test run, reset the graph, and begin re-plotting |
| B | Cancel the test run and re-enable driving. Double press to exit the tuner |
Saving Your Constants
If you had the SD card inserted, press Config then PID Data to display every variable you changed while tuning.
Then plug those values into your default constants in autons.cpp:
// Constants found from live tuning
chassis.set_drive_constants(10, 1.4, 0, 8.2, 0, 0);
To clear the data from the SD card, press Config, hold and drag your finger up the screen to scroll, then press Wipe SD.
Tuning Graphs
Here are the graphs for each tuned PID controller

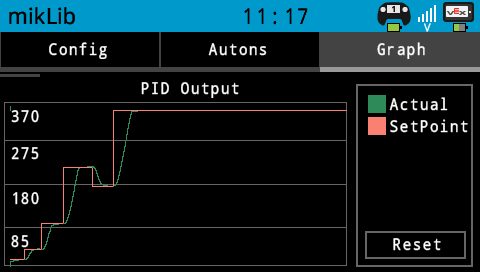
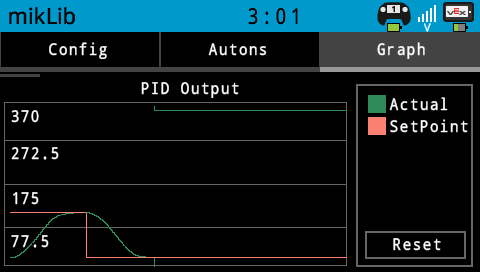
Degrees are wrapped from 0-360. Seeing discontinuity in turning graphs is normal
Exit Conditions
There are three exit conditions, which you can also adjust inside the Tuner
For better consistency increase settle time since it gives the robot more time to get into the right position
| Exit Condition | What it does |
|---|---|
timeout | Max time of the motion in milliseconds |
settle_error | Error to starting accumulating settle time |
settle_time | Amount of time the robot is inside settle error to exit |
The default exit conditions for each PID are
// Each exit condition set is in the form of (settle_error, settle_time, timeout).
chassis.set_turn_exit_conditions(1, 200, 3000);
chassis.set_drive_exit_conditions(2, 200, 5000);
chassis.set_swing_exit_conditions(1, 200, 3000);
For the drive PID, if the robot is within 2 inches of the target for 200 ms, or drives for 5000 ms then it will exit.